Table of Contents
- Why This Biscoff Cheesecake is the Ultimate Easy Recipes Dessert
- A Dessert for Every Occasion: Quick Dessert Inspiration
- Mastering the Art of No Bake Desserts with Betty Cooks
- What Makes This Creamy Desserts Recipe So Special
- Tips for Perfecting Your No Bake Cheesecake
- Why You’ll Love Making This Lotus Cheesecake at Home
- The Recipe: No-Bake Biscoff Cheesecake
- Notes & Tips for Success
Key Takeaways
This no-bake Biscoff cheesecake is the perfect easy recipes dessert for home bakers of all skill levels. With a buttery cookie crust, a luxuriously smooth filling, and a rich Biscoff topping, it requires no oven time and comes together in under 30 minutes of active preparation. Whether you’re hosting a dinner party, celebrating a birthday, or simply craving a sweet treat, this quick dessert delivers bakery-quality results with minimal effort.
Why This Biscoff Cheesecake is the Ultimate Easy Recipes Dessert
When I first discovered the magic of Biscoff spread—that irresistibly spiced, caramelized cookie butter—I knew I had to create something special with it. After countless test batches and enthusiastic feedback from family and friends, I’m thrilled to share what has become one of my most requested easy recipes dessert creations. This no-bake cheesecake combines the warm, comforting notes of cinnamon and brown sugar with a velvety cream cheese filling that melts in your mouth. As Betty from Betty Cooks, I’ve made it my mission to create desserts that look impressive but come together simply, and this one truly delivers on that promise.
A Dessert for Every Occasion: Quick Dessert Inspiration
One of the things I absolutely adore about this recipe is its versatility. Need a quick dessert for an unexpected gathering? This cheesecake can be assembled in under 30 minutes and left to set in the fridge while you attend to other things. Hosting a holiday dinner? The elegant Biscoff drizzle on top makes it look like you spent hours at the pastry chef’s bench. Planning a birthday celebration? The familiar, nostalgic flavor of Biscoff cookies appeals to both kids and adults alike. This truly is one of those no bake desserts that saves the day time and time again, proving that you don’t need an oven or complicated techniques to create something extraordinary.
Mastering the Art of No Bake Desserts with Betty Cooks
Over the years, I’ve developed a deep appreciation for no bake desserts. They’re forgiving, accessible, and perfect for warm weather when turning on the oven feels like a chore. At Betty Cooks, I focus on recipes that build confidence in the kitchen, and this no bake cheesecake is a fantastic starting point for anyone new to making desserts from scratch. The techniques are straightforward—crushing cookies, beating cream cheese until smooth, folding in whipped cream—but the result is nothing short of spectacular. Once you master this base recipe, you’ll have the skills to create endless variations using your favorite cookies, spreads, and mix-ins.
What Makes This Creamy Desserts Recipe So Special
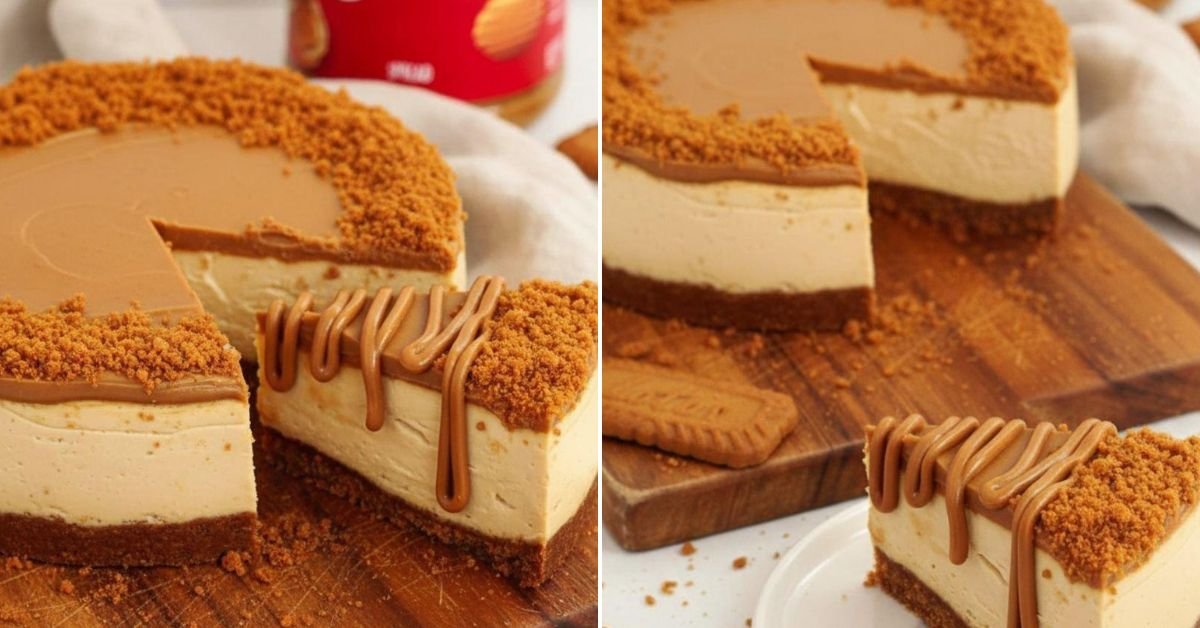
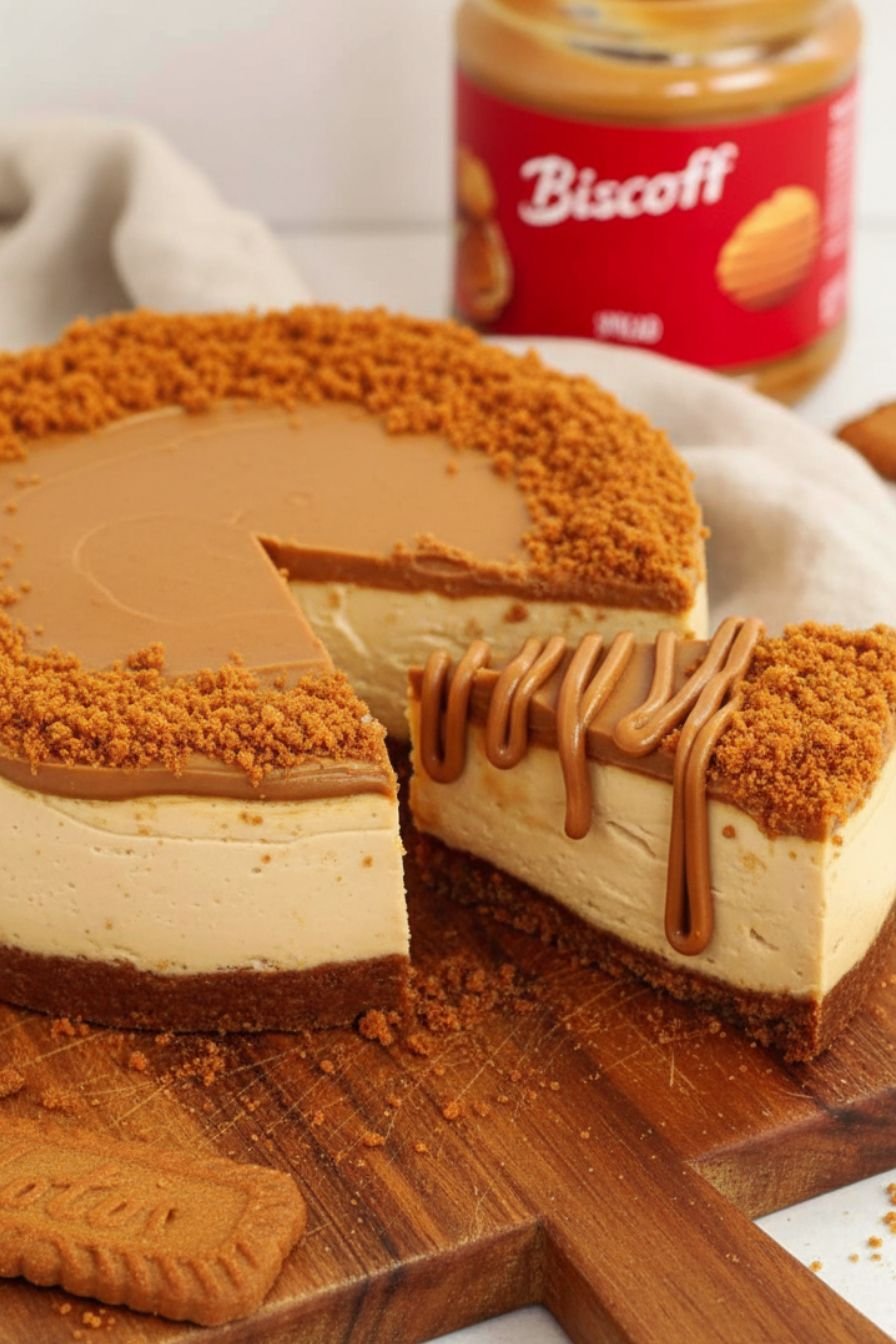
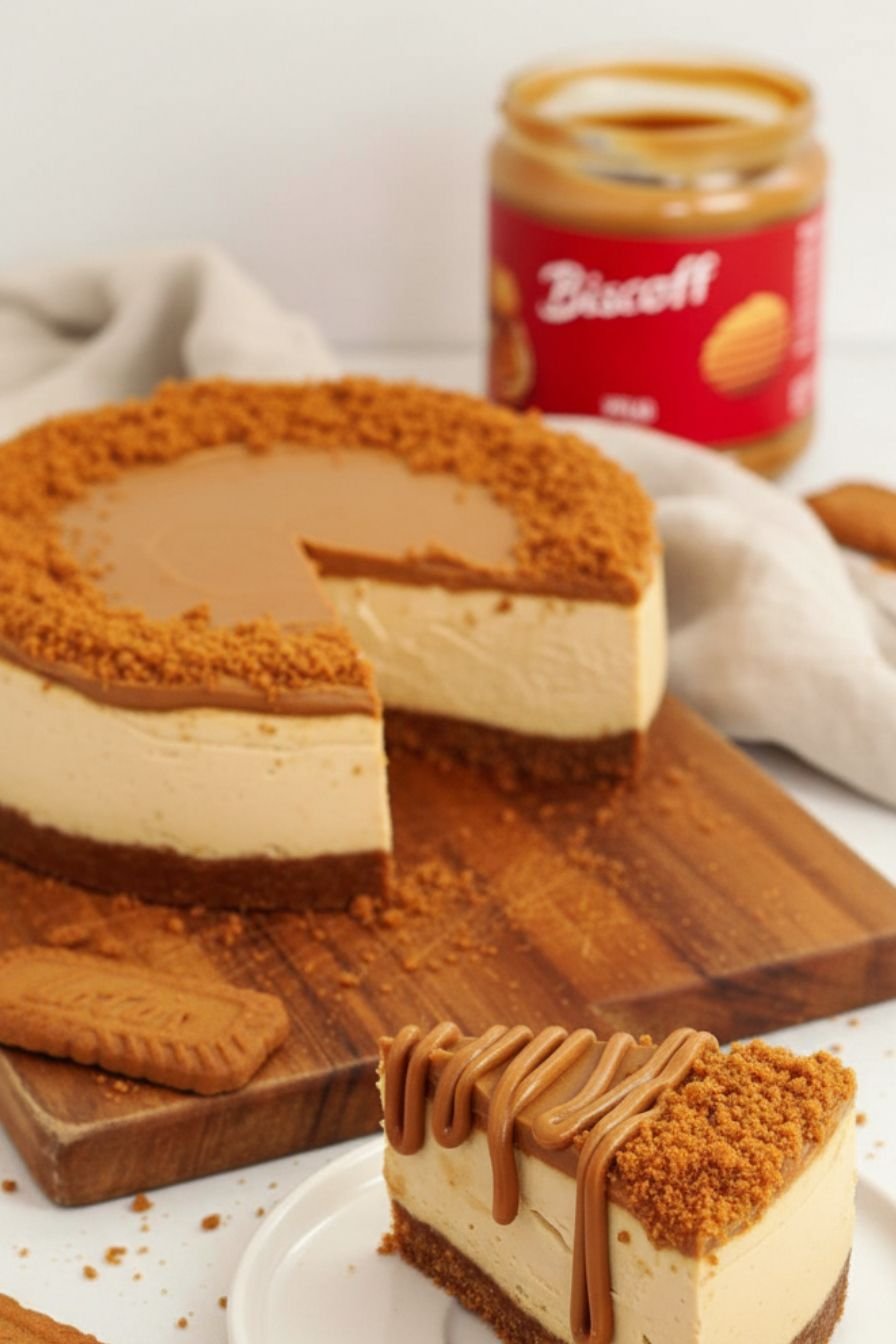
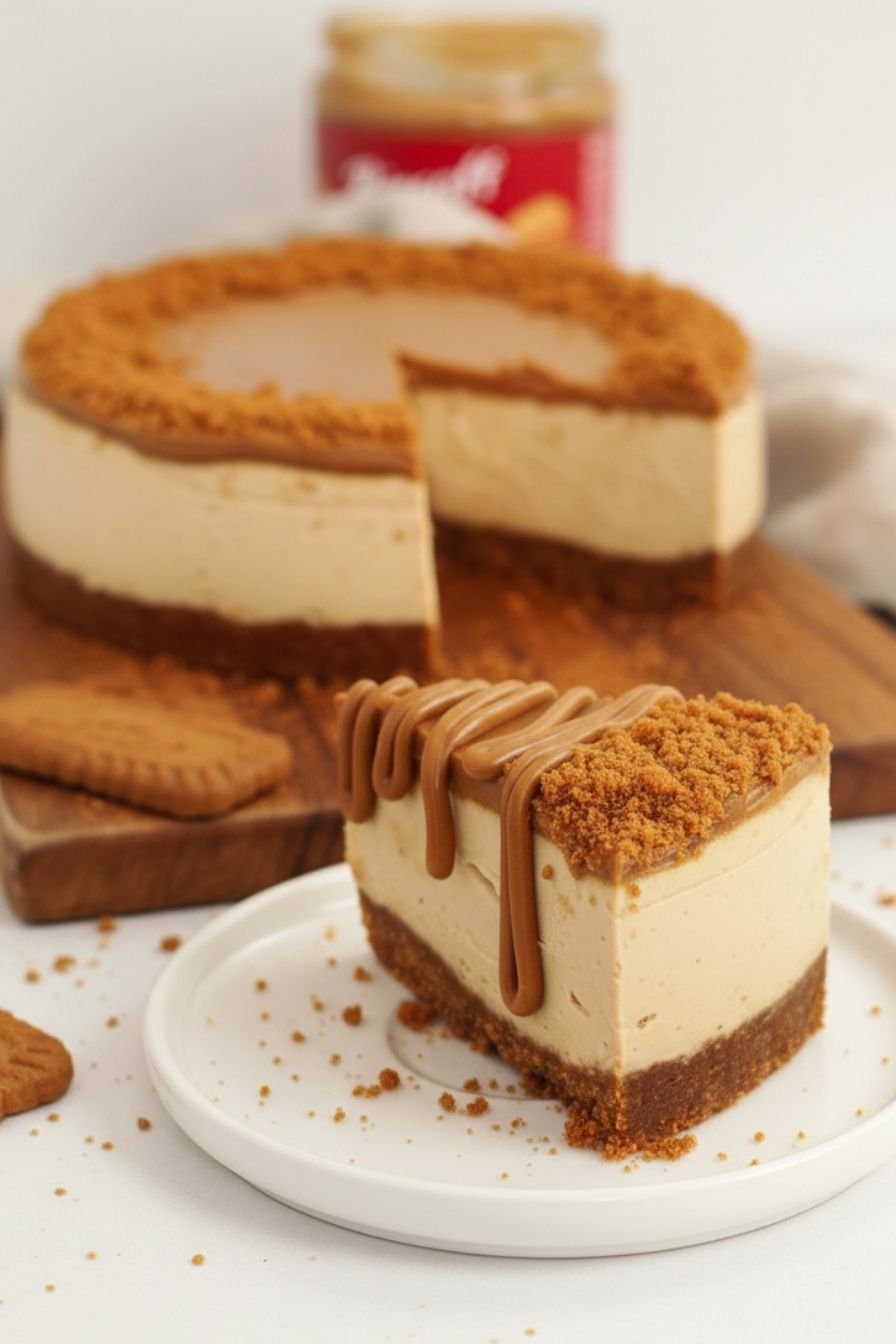
There are plenty of cheesecake recipes out there, but this one stands out for its perfect balance of textures and flavors. The crust stays delightfully crunchy, thanks to the buttery crumbs pressed firmly into the pan. The filling achieves that elusive quality of being simultaneously rich and light—dense enough to feel indulgent yet airy enough that you’ll find yourself reaching for a second slice. And the topping? A generous layer of melted Biscoff spread that sets into a glossy, crackly shell that shatters beautifully when you cut into it. This creamy desserts recipe has become a staple in my kitchen because it never fails to earn rave reviews, and I’m confident it will become a favorite in yours too.
Tips for Perfecting Your No Bake Cheesecake
Over the years of making no bake cheesecakes, I’ve learned a few crucial tips that make all the difference. First and foremost, use full-fat cream cheese and double cream—the higher fat content is essential for a firm set and creamy texture. Let your cream cheese come to room temperature before you start; cold cream cheese will create a lumpy, uneven filling no matter how long you beat it. When folding the whipped cream into the cream cheese mixture, use a gentle hand to preserve all that lovely air you worked so hard to incorporate. Finally, resist the temptation to cut into the cheesecake too soon. A full 6 hours in the refrigerator, or preferably overnight, ensures a clean slice every time.
Why You’ll Love Making This Lotus Cheesecake at Home
There’s something deeply satisfying about creating a dessert that tastes like it came from a high-end bakery, right in your own kitchen. This Lotus cheesecake (as many of my readers call it, after the brand name of the cookies) has become one of my most beloved recipes because it delivers that exact experience. The ingredients are readily available at most grocery stores, the equipment required is minimal, and the process is stress-free. Whether you’re making it for a special celebration or just because it’s Tuesday and you deserve something wonderful, this recipe is guaranteed to bring smiles to the table.
The Recipe: No-Bake Biscoff Cheesecake
Now let’s get to the part you’ve been waiting for! Below you’ll find the complete recipe with detailed instructions to guide you through every step. Remember, the key to success with this no bake dessert is patience during the chilling time—trust the process, and you’ll be rewarded with a cheesecake that’s absolutely stunning in both appearance and flavor. If you have any questions along the way, I’m always available in the comments section of Betty Cooks. Happy baking (or rather, happy no-baking)!
Notes & Tips for Success
Make-Ahead Friendly: This cheesecake is the ultimate make-ahead dessert. Prepare it up to two days in advance and keep it refrigerated until ready to serve. The flavors actually deepen and improve after a day of resting.
Storage Instructions: Store any leftover cheesecake in an airtight container in the refrigerator for up to 5 days. The crust will remain pleasantly crunchy if kept properly covered.
Freezing Option: You can freeze this cheesecake for up to 3 months. Wrap it tightly in plastic wrap and then aluminum foil before freezing. Thaw overnight in the refrigerator before serving.
Variations: Feel free to experiment with other cookie spreads! Nutella, peanut butter, or caramel sauce all make wonderful alternatives to Biscoff. You can also add a pinch of sea salt to the topping for a delightful salted caramel effect.
Equipment Note: A springform pan is essential for easy removal. If you don’t have one, a regular cake pan lined with parchment paper will work—just be prepared for a slightly trickier unmolding process.
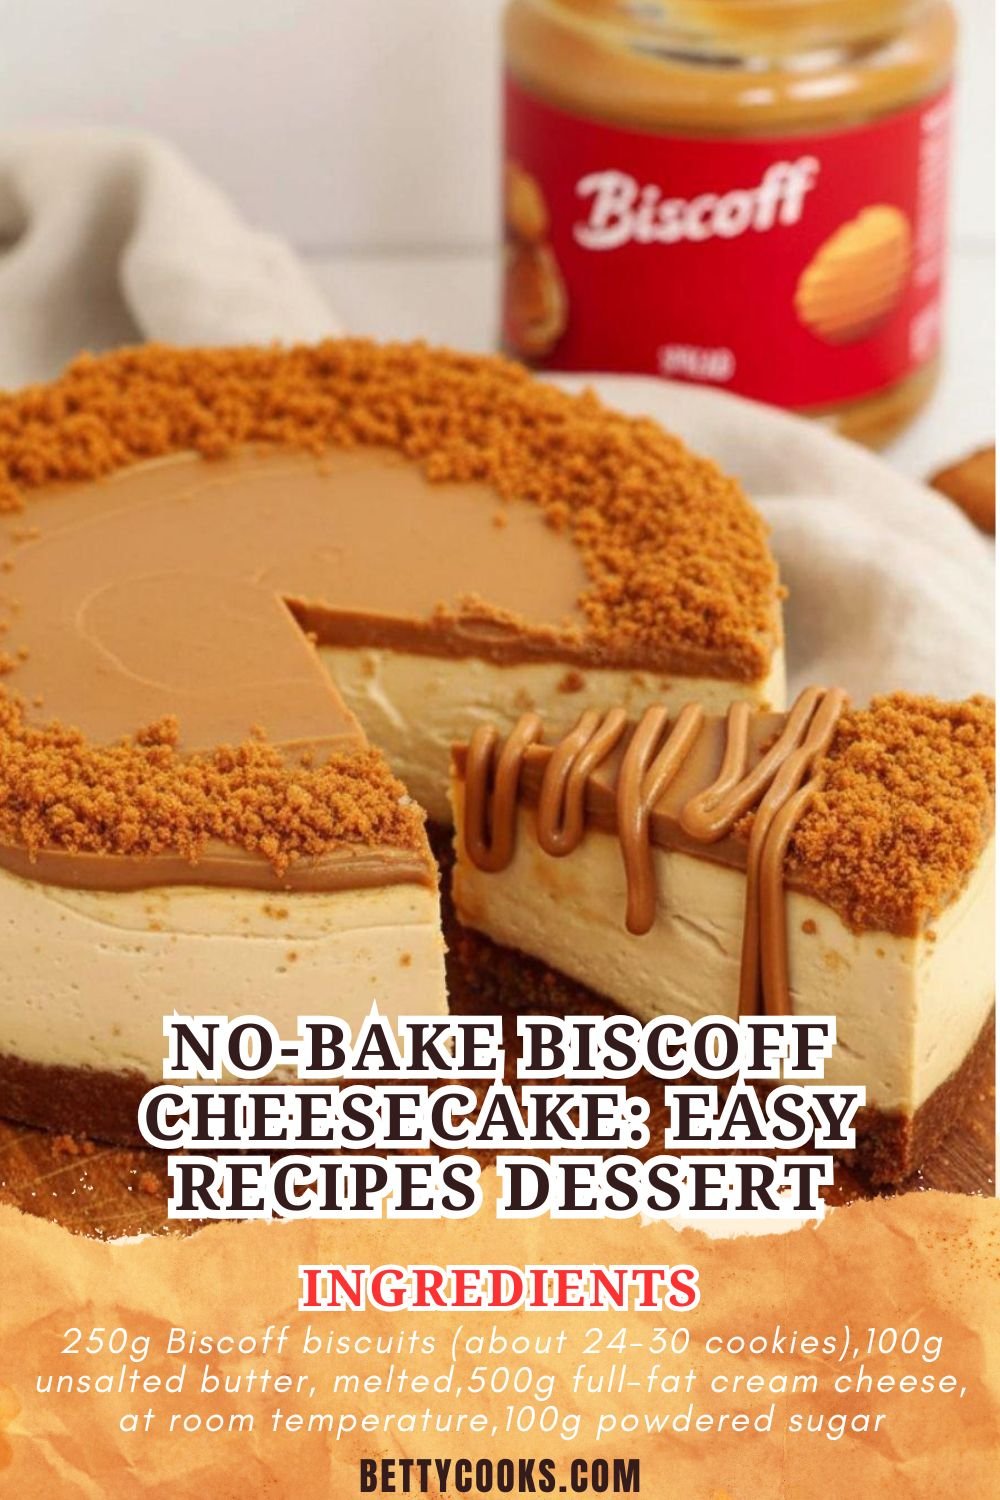

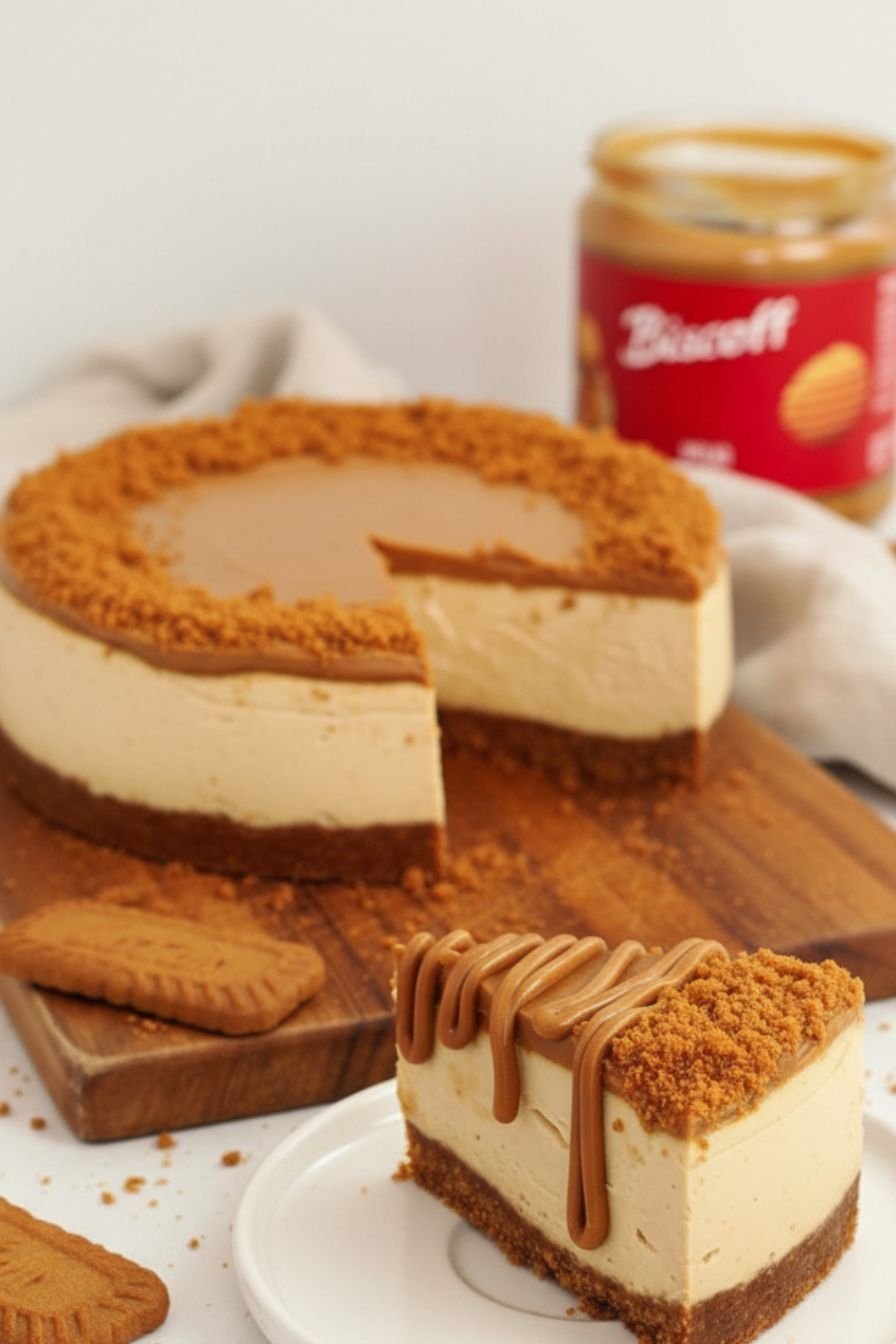
No-Bake Biscoff Cheesecake: Easy Recipes Dessert
Ingredients
For the Base
- 250g Biscoff biscuits (about 24-30 cookies)
- 100g unsalted butter, melted
For the Filling
- 500g full-fat cream cheese, at room temperature
- 100g powdered sugar
- 1 tsp vanilla extract
- 300ml double cream (heavy cream)
- 150g smooth Biscoff spread (cookie butter)
For the Topping
- 100g smooth Biscoff spread, melted
- Additional Biscoff biscuits for decoration (optional)
Instructions
For the Base
- Place the Biscoff biscuits into a food processor and blitz until they form fine crumbs. Alternatively, place them in a sealed zip-top bag and crush with a rolling pin.
- Add the melted butter and pulse until well combined. The mixture should resemble wet sand and hold together when pressed.
- Press the crumb mixture firmly into the base of a 20cm (8-inch) springform pan. Use the back of a spoon or a flat-bottomed glass to press it down evenly, making sure to cover the entire bottom and slightly up the sides.
- Place in the refrigerator to chill and set for at least 20 minutes while you prepare the filling.
For the Filling
- In a large bowl, beat the cream cheese with an electric mixer until smooth, creamy, and free of lumps.
- Add the powdered sugar and vanilla extract, beating until fully combined and smooth.
- In a separate bowl, whip the double cream until stiff peaks form. Be careful not to over-whip.
- Gently fold the whipped cream into the cream cheese mixture using a spatula, working in batches until just combined. Do not overmix.
- Warm the 150g of Biscoff spread in a microwave-safe bowl for 20-30 seconds until runny and pourable. Let it cool slightly.
- Fold the melted Biscoff spread into the cream cheese mixture until fully incorporated, creating a smooth, caramel-colored filling.
- Pour the filling over the chilled biscuit base and smooth the top with an offset spatula.
- Refrigerate for at least 6 hours, or preferably overnight, until completely set and firm.
For the Topping
- Once the cheesecake is fully set, remove it from the springform pan by gently running a knife around the edge before releasing the clasp.
- Place the cheesecake on a serving plate.
- Warm the remaining 100g of Biscoff spread in a microwave for 20-30 seconds until runny.
- Pour the melted Biscoff over the top of the cheesecake, spreading it evenly to the edges with a spatula or the back of a spoon.
- Decorate with additional Biscoff biscuits, crumbled pieces, or a drizzle of extra spread if desired.
- Allow the topping to set for 10-15 minutes before slicing and serving with a sharp knife.


Leave a Comment