
Table of Contents
- Introduction
- Why You’ll Love These Mini Cherry Pies
- The Secret to a Perfect Flaky Crust
- Choosing the Best Cherry Filling
- Tips for Baking Mini Pies
- How to Serve and Store Your Mini Pies
- Key Takeaways
Key Takeaways
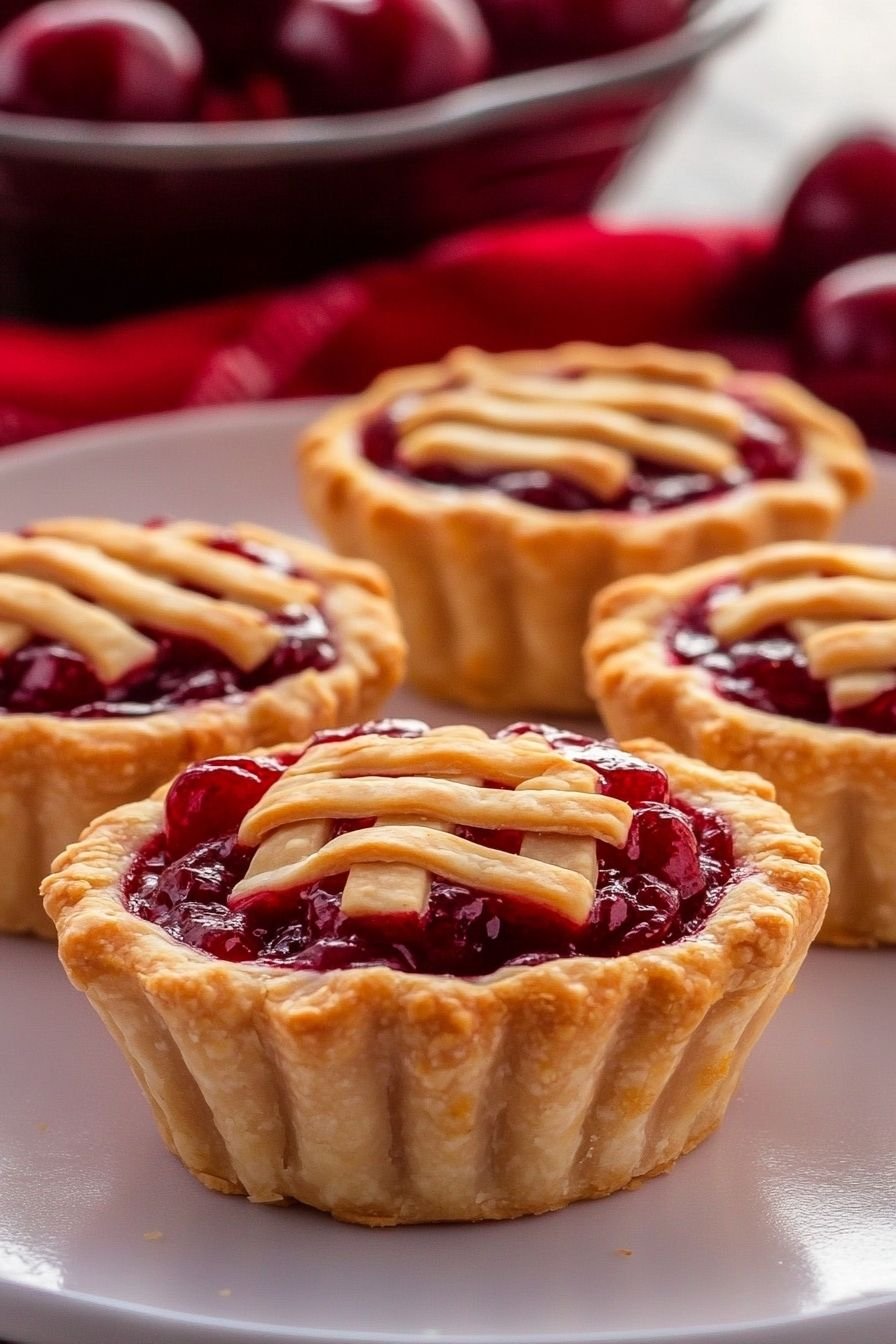
These Mini Cherry Pies are an easy recipe that combines a buttery, flaky crust with a sweet cherry filling. They are perfect for parties, quick desserts, and family gatherings. With just a few ingredients and a simple baking process, you’ll have a delightful treat ready in no time. You can even customize them with different fruit fillings!

Introduction
Welcome to Betty Cooks, your go-to destination for easy recipes that bring joy to your kitchen! Today, we’re sharing one of our all-time favorite sweet treats: Mini Cherry Pies. These delightful little desserts are perfect for anyone who loves a classic cherry pie but wants a quick and easy version. They are buttery, flaky, and filled with a rich, juicy cherry filling that’s simply irresistible.

Why You’ll Love These Mini Cherry Pies
If you love easy recipes that taste amazing with minimal effort, these Mini Cherry Pies are for you. They are perfect for weeknight desserts, special occasions, or as a fun baking project with kids. Since they are handheld, they’re great for parties, picnics, and holiday gatherings.
- Simple ingredients and easy to make
- Perfectly portioned for individual servings
- Flaky crust with a rich, sweet filling
- Great for holiday treats or any occasion
The Secret to a Perfect Flaky Crust
A great crust is what makes these Mini Cherry Pies truly special. Using high-quality refrigerated pie dough or making your own from scratch can elevate the texture and flavor. Make sure to keep the dough chilled before rolling it out to ensure the flakiest result. Brushing the tops with an egg wash gives them a golden, glossy finish.

Choosing the Best Cherry Filling
The heart of any good cherry pie is the filling. You can use store-bought cherry pie filling for a quick option, or make your own by simmering fresh or frozen cherries with sugar and cornstarch. For an extra depth of flavor, try adding a touch of vanilla extract or a pinch of cinnamon.
Tips for Baking Mini Pies
Here are some essential baking tips to ensure your Mini Cherry Pies turn out perfect every time:
- Preheat your oven properly before baking.
- Use a fork to crimp the edges to seal in the filling.
- Brush with egg wash for a golden finish.
- Allow pies to cool slightly before serving.
How to Serve and Store Your Mini Pies
These Mini Cherry Pies taste amazing on their own, but you can also serve them with vanilla ice cream or a dusting of powdered sugar for an extra touch of sweetness. Store leftovers in an airtight container at room temperature for up to two days, or refrigerate for longer freshness. They can also be frozen for future enjoyment.
Ready to bake your own batch of Mini Cherry Pies? Follow our easy recipe and enjoy a homemade treat that’s sure to become a family favorite!


Mini Cherry Pies
Ingredients
- 1 package refrigerated pie crusts
- 1 cup cherry pie filling
- 1 egg, beaten
- 1 tbsp sugar
- 1 tsp cinnamon (optional)
Instructions
- Preheat oven to 375°F (190°C) and line a baking sheet with parchment paper.
- Roll out the pie crust and use a round cutter to cut small circles.
- Place a spoonful of cherry pie filling onto half of the circles.
- Cover with remaining pie crust circles and press edges together with a fork.
- Brush with beaten egg and sprinkle with sugar and cinnamon.
- Bake for 15-20 minutes or until golden brown.
- Let cool before serving.


Leave a Comment